Thursday 17 December 2015

Rockin' Robin Stamped & Coloured Christmas Gift Tag


I love these cute Rockin’ Robin stamps and used them to create a little gift tag.  The tag shape is a bauble design cut on my Cricut Explore (my DS link below) but it’s a simple shape and can easily be drawn with a pencil onto your card if you prefer.  You will have 3 layers to the bauble, 1 blue, 1 red and 1 white hammered card.

I cut the base shape from PMD Sky Blue card and glued the 2nd layer cut from PMD Post Box Red card directly on top.  I applied glue to the top ‘cap of the bauble and sprinkled with glitter, shaking off the excess.  I did the same to the red card part, but only applying glue and glitter to the outside edges as the main part will be covered by the stamped panel.

Using Memento inks, stamp one of the robin characters onto smooth white card, stamp the sentiment, little Santa hat and 2 lots of the holly leaves.  If you have the matching die set, use that to cut the stamped images out.  If you don’t have the die set then cut around each image using scissors or craft knife leaving a small white border.  Die cut, or cut by hand, a branch shape from PMD Mocha Brown card.

Work out where you want to position your images on the white hammered card piece, then stamp the music notes in brown ink at right hand side.  Glue the branch towards bottom of white hammered card shape.  Add Sentiment, Robin and Santa hat and holly leaves using 3D foam pads.

When image panel is complete, add 3D foam to the back and adhere to the layered bauble tag base.  To finish, tie lengths of sheer white and red glittery ribbon through the hole at the top, making a bow with the white ribbon.


Materials Used:PMD  White Smooth
PMD White Hammered
PMD Post Box Red Card
PMD Sky Blue Card
PMD Mocha Brown
Rockin’ Robin Clear Stamp Set – Clearly Besotted
Rockin’ Robin Die Set – Clearly Besotted
Memento Dewdrop Ink pads in shades of brown, red & green – Tsukineko
Nuvo Pure Sheen Glitter – Diamond – Tonic Studios
Nuvo Glue Pen – Tonic Studios
White sheer ribbon, Red sparkly ribbon from stash
Design Space Link for the Tag Shape - https://uk.cricut.com/design/#/canvas/33277895

Papermill Design Team:
if you have a moment, please do pop over and check out the other papermill teamies blogs and see what they got up to this week: 

Thursday 3 December 2015

Christmas Snowflake Gift bag with Papermilldirect


Hello, firstly apologies for my lack of posts over the last couple of weeks, I've not been feeling 100% but I'm back in blogland and trying to catch up, so first up here's a little gift bag, one of my Design Team makes for Papermill, it’s a simple make and easily adapted to use any ribbons, dies or colour-schemes you have in mind.  I’ve chosen the Papermilldirect Ultra White Pearlised paper for this gift bag as the weight is ideal, strong enough to hold its scores (and treats of of course) and yet easy to pinch in for the sides. The pretty shimmery finish is perfect for festive makes adding a touch of luxury to your gift giving.  These bags are easy and quick to make so they are perfect for batch making.  I have used folds and ribbon to seal the bags, simply undo the ribbon at the back to release the folded section of the bag.  You could also seal the back with a little festive sticker or label if you prefer.
To create the Gift Bag: Take a sheet of A4 Ultra White Pearlised paper and trim to measure 21cm x 28cm.
Using a scoreboard position paper with long side across the top and score down at 6m intervals to give 4 score lines and an extra 2.5cm section at the end (this will be a joining tab later)
Now turn paper so short side is across the top and score a line at 6cm down.  This will give a row of squares.
Use scissors or craft knife to cut each score line on the squares just up to the 6cm score line to give 4 equal squares and 1 smaller rectangle.  Cut away the smaller rectangle completely.
Crease each score line of the whole sheet and form the bottom squares into tabs as you would if making a box.  I used double sided tape to adhere each flap on top of another.  When gift box bottom is completed add tape or glue to the smaller side panel and adhere this panel in place behind the next panel to enclose the sides.  Then pinch in the sides to create the gift bag shape.
Pop your gifts or treats into the bag and squeeze the top together, turn over the top once or twice to the back and you can add a sticky label at the back to seal it if desired or seal with the ribbon trim as I have done here.

For the ribbon trim, take a length of Christmas ribbon (my sentiment ribbon reads ‘Do Not Open Until Dec 25th).  Add strong doubles sided tape to the back and apply ribbon around the top of the bag with joint at the back.  Add another length of ribbon to go up the front of the back (parcel style) again using strong double sided tape to attach.  Take another length of ribbon and trim ends, form a loop and attach to top right of ribbon band.
Die-cut 3 small snowflakes and glue flat to the gift bag at the bottom to add extra interest and texture. 
To finish, Die cut and layer snowflakes as desired from PMD Ultra White Pearlised Paper and PMD Post Box Red Card.  Use 3D foam pads to create dimension when layering.  Add a clear sparkly adhesive gem in the centre to top off the snowflake.
Materials Used:
Ultra White Pearlised Paper – Papermilldirect
Post Box Red Card - Papermilldirect
Spellbinders Shapeabilities Create a Flake three #S4-340
Cuttlebug Snowflake #2 – Provocraft
Adhesives: Double Sided Tape, 3D foam pads, glue
Xmas Ribbon, Sparkly adhesive gem

Papermill Design Team:
if you have a moment, please do pop over and check out the other papermill teamies blogs and see what they got up to this week: 

Tuesday 27 October 2015

Star of Wonder... with Papermilldirect


To create my card base I scored and folded an A4 sheet of PMD White Linen card and then trimmed it down to approx 5.5" square. The card will be used in 'tent' position with the fold at the top.
I thought I would test the Canary Yellow card in my Cricut Explore and created this 2 layered Christmas Star ornament shape, I chose the shape from the 'Quilted Ornaments' design set / cartridge, which is free if you have the subscription.   The intricate design top layer cut perfectly in my Explore and I cut a bottom layer from PMD Ultra White Pearlised to add a subtle sparkle, using cosmic shimmer clear drying glue to adhere the layers together.

Using my Explore and a black pen, I cut a square of PMD White Linen card approx 4 5/8" square and 'attached' some text to run along the bottom, the sentiment being 'Star of Wonder', I wanted to add a modern look and went with 'Wonder Star of Wonder Star' so that it stretched across the bottom of the white linen square.  I must confess that my black Cricut pen has run out and so I have improvised and am using a Black Pilot V5 pen instead which I am pleased to report has given a great result on the linen textured card.

A square of Canary Yellow card was cut at approx 5" square as a mat layer to add the pop of colour that will cordinate with the star shape, and the text square was adhered ontop using double sided tape.  I found some elasticated gold twine and wrapped it across the top of the card and secured the ends on the back with strong doubled sided tape.  The panel was then mounted onto the card front  using 3D foam pads to give height.
I wanted to keep a clean simple look to the star, as a lot of the design element is in the cut out detailing, so I just added a faux pearl to the centre and a few clear adhesive gems, before mounting the star to the card front using 3D foam pads.  I positioned the star at an angle and added a bow of gold fluted ribbon to the loop so that it looks as if the ornament is hanging from one of the strings of gold twine.
This was a really quick idea and quick to make, I was happy with how it turned out and how well this particular shade of yellow worked for a Christmas theme.

Materials Used:
Canary Yellow 240gsm - Special Offer Card - Papermilldirect
White Linen Card - Papermilldirect
Ultra White Pearlised Card - Papermilldirect
Gold Twine, Gold Ribbon, Adhesive Pearl and Clear Gems - from stash
Adhesives used: Cosmic Shimmer clear drying glue, 3D foam pads, double-sided tape
More ideas for using Papermilldirect cardstocks with a Cricut machine can be found by using this quick link here:http://pollypurplehorse.blogspot.co.uk/search/label/cricut


Papermill Design Team:
if you have a moment, please do pop over and check out the other papermill teamies blogs and see what they got up to this week: 

Saturday 17 October 2015

Wicked Wishes...with Papermilldirect


Hello, this week the +papermilldirect DT have been working on Halloween makes and I have this card to share with you.  There are some fabulous shades of cardstock in the Papermilldirect colours range just perfect for Halloween makes like my favourite Purple Grape along with Bright Orange, Apple Green and of course Black.  I created this little shaped card by using one of the Halloween images in Cricut Design Space, I duplicated the base layer and flipped it, moving it up against its mirror image and overlapping it before aligning both shapes along the bottom and then selecting ‘weld’ to form the base of a shaped card that can be folded in half. 
If you’d like to make this card this is my Design Space link which means that you don’t need to do the mirroring and welding steps at all, it is already done for you and all the pieces are sized, colour coordinated and ready to just press ‘go’.  When you have the pieces cut out, just score and fold the purple base card in half to form the card base, layer up the other shapes and glue together using a clear drying glue and decorate as desired.

 
When using my Cricut to cut images I often like to add some detail to what would otherwise be ‘flat’ shapes.  For this design I chose to use some embossing folders through my manual die cutter machine.  You can see the embossed detail adds more interest and makes for a more tactile card.  For the Sentiment of ‘Wicked Wishes’ I used a collage embossing folder.  I also used some Stickles glitter glue in ‘Mercury Glass’ to edge around the words and added some dots of Liquid Pearls in a black colour.
To decorate the hat part of the card I added different sized gold and silver sequins, filled the star cut-outs with the Stickles glitter glue and used it to outline the green star too.  Little dots of black Liquid Pearls were added to the centres of the sequins, star and also on the green hatband, along with dots of Stickles glitter glue.  It's fun to experiment with embossing folders and I like to mix and match electronic cutting with other techniques. What do you think? Are you working on Halloween designs?   or using embossing folders?  Why not share your makes over on the papermilldirect facebook page, we'd love to see them, Angela x

Materials:
Purple Grape Card - Papermilldirect
Bright Orange Card - Papermilldirect
Apple Green Card - Papermilldirect
Black Card - Papermilldirect
Cosmic Shimmer glue – Creative Expressions
Stickles ‘Mercury Glass’ – Ranger
Liquid Pearls ‘Onyx Pearl’ – Ranger
Tim Holtz ‘Collage & Notebook’ embossing folders – Sizzix
Gold & Silver sequins
my Cricut Design Space link: https://uk.cricut.com/design/#/canvas/32014804

Papermill Design Team:
if you have a moment, please do pop over and check out the other papermill teamies blogs and see what they got up to this week: 


Tuesday 6 October 2015

Wishing you a Sparkly Christmas!!


Hello I'm back again with this week's +papermilldirect  post and I was hoping to post the details of this week's Special Offer but it seems it has sold out already!!  However if you pop on over to the Special Offers section there are still some other delights to tempt you, and perhaps a browse through the card and paper selections too?  (As always all links to materials, DT Blogs and Challenges Entered appear at the end of the post).

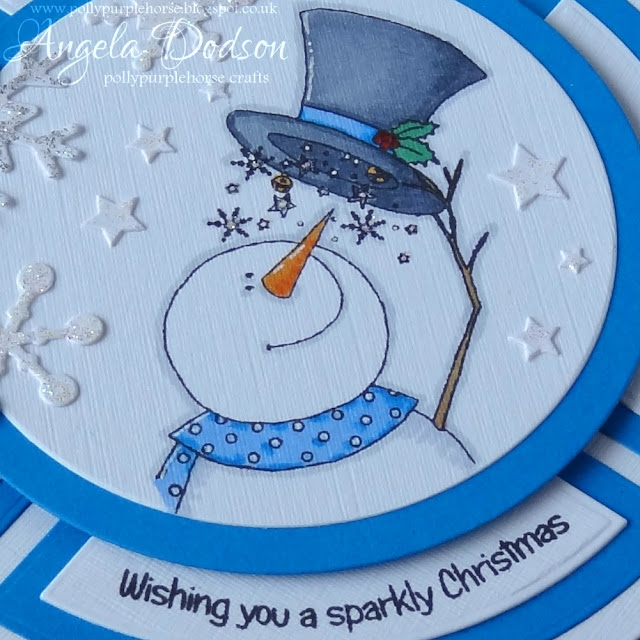
So onto my make for this week which is a little shaped Christmas card idea which has been inspired not only by the beautiful papermilldirect cardstocks, but by 2 new additions to my crafting stash.   The Little Claire’s snowman stamp (which I was lucky enough to win recently) and the Crealies Patchwork dies which I have had my eye on for quite a while now. 

I started off by using the large circle die within the Crealies set to die-cut 2 large circles from Papermilldirect White Linen cardstock, one for the card front and one will be the back.  The Crealies die set also comprises of nesting shapes that you can assemble to create different patterns (patchwork effects) to make your own simple or more involved designs.  I chose to keep it simple for my first test and used 2 of the nesting quarter circle shapes.  I cut the larger one 4 times from the PMD Ocean Blue card and the slightly smaller one 4 times from the White Linen card.  The sentiment of ‘ Wishing you a Sparkly Christmas’ was stamped onto one of the white linen quarters using black Memento ink, before stamping I took the clear stamp and curved it a little on the stamp block so that it would roughly follow the curve of the shape.  I then glued the smaller shapes on top of the larger ones using a clear drying glue as this allowed me a little time to ‘wriggle’ them into place.  I then glued the completed quarters onto one of the large White Linen circles, evenly spacing it out, using the clear glue again is very helpful to achieve an even space (there is also a downloadable template available to help with spacing the patchwork dies).  As it is a symmetrical design you can arrange the segments however you wish, I chose to position the stamped sentiment segment at the bottom.

To create the card blank, I took the other large white linen circle shape and scored a line across the top of the back a little way down, just over an 1”, I then cut a very small piece of card off the bottom, this will enable the card to stand by itself, unless you want your card to rock n’ roll, which is also a fun alternative I have used sometimes.  Add clear drying glue or double sided tape to the inside back section above the score-line and stick it to the back of your segmented card front, you should now have a circular card that stands up.

Using black ink to stamp the cute snowman image onto papermilldirect White Linen card, I then coloured with a variety of First Edition alcohol marker pens (all colour details below), extra details were added with a white pen.  When the image was dry I used a set of circle dies, a smaller one to cut the image and a slighter larger one to mat it, again using some of the clear drying glue to adhere.  3D foam pads were used to adhere the snowman panel to the centre of the card front, giving a little extra height and dimension.

To add some extra detail & sparkle to the design and to fit the theme, I used snowflake & star dies and added different glitter glues to each one, silver and crystal colours, also adding a tiny dab to some of the snowflakes in the stamped image.  I was quite pleased with how the new dies set works and look forward to more experimenting with them and I love the cute snowman stamp, it was easy to colour and having the matching sentiment in the set was really useful.  I do like stamping and colouring onto textured card and the Papermilldirect Linen card gives such a great tactile finish.

Materials Used:
White Linen Card – Papermilldirect
Ocean Blue Card – Papermilldirect
Clear Stamp - ‘Have a Sparkly Christmas’ – Little Claire Designs
Die Set - Modern Patchwork No. 1 – Crealies
Die Set – Circles Framelits #657551 – Sizzix
Die Set – Snowflake #2 – Cuttlebug / Provocraft
Ink Pad – Tuxedo Black - Memento
Alcohol Markers – First Edition
(Holly = 26 Jade, 16 Ruby, Hat = 02 Cool Grey, 03 Slate, Carrot Nose = 41 Satsuma, 42 Pumpkin, Hatband & Scarf = 21 Cornflower, 19 Baby Blue, Twig Arm = 49 Tan, Outline Shading = 01 Light Grey)
Glitter Glue – Crystal and Silver
White Pen – Pergamano
Adhesives – Clear Drying Cosmic Shimmer Glue, 3D Foam Pads

 Challenges Entered:
Crafty Sentiments - Anything Goes Challenge - Link Here
Crafty Cardmakers and More - Challenge #149 Circular Cards - Link Here

Papermill Design Team:
if you have a moment, please do pop over and check out the other papermill teamies blogs and see what they got up to this week: 


Friday 2 October 2015

A Sweet Little Girl.....back to basics New Baby card with Papermilldirect

Hello, welcome to this weeks +papermilldirect  post and it's a bit of a back to basics card project.  This one is ideal for those that may not have Electronic cutting machines or manual die-cutters or punches.  It is also ideal for those that are maybe not as confident with inks and stamping and the colouring is easy with no tricky shading.  Or perhaps like me, you just fancy doing something simpler for a change.  The card is a simple design and you could of course colour your image using pencils or even paper-piecing if you prefer.  The design can also make use of any ribbons, buttons or flowers you may already have in your craft stash.
I started by printing off the downloaded Image set (details at end of post) onto Papermilldirect White Linen Paper, You could also use the White Linen Card if preferred.  The image set I chose prints 4 to an A4 sheet, so plenty to practice on if you want to test your colour combos. 
My Chosen Elephant image was coloured with alcohol marker pens in shades of pink by block colouring each section, so no shading to worry about.  I used 3 shades of pink for the elephant and a touch of yellow for the bow and inside the white flower.  The grass area was created by simply dotting randomly with the tips of 2 different green shades of marker.  I allowed the marker pens to dry fully before adding some extra details with a white gel pen.  It’s easy to add simple polka dots to areas such as the legs, tail and inside ears, for the body I doodled simple flower shapes, the white became brighter and more noticeable as the white ink dried and I added some to the white flower the elephant is holding.
 I trimmed the completed image panel down to approx. 3 ¾ “x 4 ¾ “and matted & layered it first onto a slightly larger piece of PMD Raspberry Pink card and then again onto a slightly larger panel of PMD Daffodil Yellow card using a combination of clear drying glue and double sided tape.  To complete the panel a pink ribbon was attached across the bottom and the ends secured onto the back using double sided tape.  A pale yellow felt flower was glued to the right hand side and topped with a pink button threaded with twine tied in a bow. 
To create the card blank, I took an A4 sheet PMD White Linen card in portrait position and cut down at approx. 5”, then scored and folded the piece in half to give a 5” x 5 ¾” card base.  The completed layered panel was then attached to the front using 3D foam pads.
I really liked the colour combination of pink and yellow teamed with the bright white of the card base.  Using Linen paper and card added texture and interest and Linen always gives such a lovely quality finish to your projects.

For more Baby Card inspiration using Papermilldirect cardstocks check my Blog Links (HERE)


Materials Used:
Baby Elephant – Digital Image set £1 – Pink Petticoat
http://www.pinkpetticoat.co.uk/digi_stamps_boutique/digi_stamps_baby_elephant/baby_elephant.php
(Download prints 4 elephants to a page or single images, includes with sentiments and without sentiments, Sentiments are ‘A Sweet Little Girl’, ‘A Sweet Little Boy’ and ‘Welcome Little One’)

White Linen Paper - Papermilldirect
White Linen Card - Papermilldirect
Raspberry Pink Card – Papermilldirect
Daffodil Yellow Card – Papermilldirect

Pink, Yellow & Green Markers - First Edition
(Sorbet (43) Candy (44) Pale Pink (46) Lemon (38) Pistachio (25) Jade (26))
White Gel Pen 0.7 – Pergamano
‘With Love’ Sentiment Ribbon – Belle & Boo
Felt Flower, Button, & Twine from stash
Adhesives:  Cosmic Shimmer Clear Drying Glue, 3D Foam Pads, Double Sided Tape


Papermill Design Team:
if you have a moment, please do pop over and check out the other papermill teamies blogs and see what they got up to this week: 


https://www.papermilldirect.co.uk/
Click Logo to go direct to papermill

Tuesday 29 September 2015

Just For You...with Papermilldirect


Hello I'm back again with one of the two designs I had fun creating with this week's Special Offer Tangerine Card from Papermilldirect.  This card has been created using a manual die-cutter (my old trusty Big Shot) and a selection of dies.  (please see other post for a design using the Cricut Explore)
Using just 3 colours I created this little shaped standing card.  Tonic dies were used to cut the fancy ‘loopy lace’ front panel from this week’s special offer ‘Tangerine’ cardstock, I cut a backing panel and card back from PMD Ivory smooth cardstock and assembled a little card as follows. 
Taking one of the Ivory card shapes I scored and folded the back before joining to the other Ivory shape to form a little standing card, using a strip of double sided tape and a little cosmic shimmer glue just above the score line.  The tangerine ‘Loopy Lace’ panel was attached to the front using 3D foam pads in the centre only, to create depth.

I then cut a smaller ‘Loopy Lace’ panel set reversing the colours, so an Ivory panel was on top.  I stamped a sentiment in the centre of the panel  ( I used ‘Just For You’ from the Belle & Boo stamp set) stamping in an orange toned ink and then sprinkling with clear embossing powder before embossing with an heat gun.   Then mounted the sentiment panel on top of its base mat of Tangerine card using 3D foam pads and gluing the completed sentiment panel to the base card using Cosmic Shimmer glue.
The flowers were die cut from Ivory Smooth card and the leaves from Spring Green card using Sue Wilson ‘Faux Quilled Blooms’ die set. The layered butterfly was also die cut from Ivory smooth card using a Sizzix butterfly die set.
Detail Sparkle in ‘White Shimmer’ was applied to the flowers and also to the top layer of the butterfly.  When dry the flowers and leaves were shaped and added to the card front at right hand side using 3D foam pads, topping each with a faux gem in pale green or pale orange.  The butterfly was assembled with 3 small orange faux gems along the body, wings shaped and then it was glued to the card front using Cosmic Shimmer Glue.

Materials Used:
Tangerine ‘offer’ card - Papermilldirect
Ivory Smooth  card - Papermilldirect
Spring Green card – Papermilldirect
Verso Ovals ‘Loopy Lace’ die set - Tonic
Sue Wilson Finishing Touches ‘Faux Quilled Blooms’ die set - Creative Expression
Butterflies 4 - #658290 Die & Stamp set – Sizzix
Sentiment Stamp – Belle & Boo stamp set
Colour Chemistry Ink Pad ‘Triple Sunshine Yellows’ – Oak House Studio
Clear Embossing Powder
Detail Sparkle ‘White Shimmer’ – Imagination Crafts
Adhesives Used: Cosmic Shimmer ‘clear’ glue, 3D foam pads, double-sided tape

Papermill Design Team:
if you have a moment, please do pop over and check out the other papermill teamies blogs and see what they got up to this week: 


https://www.papermilldirect.co.uk/
Click Logo to go direct to papermill

Monday 28 September 2015

Be Your Own Sunshine...with Papermilldirect


Hello!!  Today I'm sharing one of the two designs I've made using this week's Papermilldirect Special Offer Tangerine card.  This card uses the Cricut Explore (another post will feature a card created with a manual die-cutter and dies).  So first up is this little Layered Quote which uses the ‘Be Your Own Sunshine’ quote set from within the subscription images in Cricut Design Space (or the intricate quotes cart or image set if you have that instead). I sized this design to measure approx.  5” x 7” so that it would fit a 5x7 envelope as a card or can be used as a small display piece as I have done here.  You can of course cut this one as large as you wish for displaying.  (I have provided my Design Space link below if you wish to cut to the dimensions I have used).
 The design consists of 3 layers, the main image has been cut from this week’s special offer ‘Tangerine’ cardstock.  Using Cosmic Shimmer clear drying glue I added blue denim effect paper behind the girl silhouette to add a pop of extra colour and interest, blue being a great contrast to orange colour tones. Just for a little extra definition I did edge the sections that make up the girl figure with a Versa Mark pen, it's quite subtle and  I highlighted the word ‘Sunshine’ using detail sparkle in ‘White Shimmer’ and left to dry.
When dry I assembled the quote design as follows,  using double sided tape to adhere the Daffodil yellow card (middle layer) onto the Bright Orange card rectangle (bottom layer).  The top panel of Tangerine was then carefully positioned on top using 3D foam pads to give height and depth to the image.  I really like the zingy colours teamed with such a bright and cheery sentiment.
    
Materials Used:
Tangerine ‘ Special Offer’ card - Papermilldirect
Daffodil Yellow card - Papermilldirect
Bright Orange card - Papermilldirect
Denim effect paper is from Me To You Tiny Tatty Teddy paper pack
Detail Sparkle ‘White Shimmer’ – Imagination Crafts
Versa Mark Pen (optional)
Adhesives Used: Cosmic Shimmer ‘clear’ glue, 3D foam pads, double-sided tape
Cricut Explore  - my Design Space Link: https://uk.cricut.com/design/#/canvas/31695738


Papermill Design Team:
if you have a moment, please do pop over and check out the other papermill teamies blogs and see what they got up to this week: 


https://www.papermilldirect.co.uk/
Click Logo to go direct to papermill