Saturday 25 March 2017

Flower Pot Card with hidden greeting - Trimcraft DT


Hello, over at +Trimcraft Ltd we have a brand new card shape of the month to play with and it’s perfect for Mother’s Day.  I have used the lovely Painted Blooms papers and the First Edition nesting blooms dies to create the flowers.  The flowers lift out to reveal the message.

Step By Step:
  1. Follow the Trimcraft Card Shape of the Month instructions (by Maxine) here: https://www.trimcraft.co.uk/blog/march-2017/card-shape-of-the-month-flower-pot-card-tutorial which includes the template to create the flower pot card base.
  2. Use Painted Blooms paper to cover the front of the plant pot and ink around with a brown ink to define the shape.
  3. Stamp the Dovecraft clear stamp ‘To the World you are a Mother…’onto the stalk tab section using black ink and allow to dry.
  4. Create flowers from Painted Blooms papers in the 6x6 pad by diecutting with the FE Nesting Blooms shapes.  Snip into each flower shape and glue 1 petal on top of 1 other to create a shaped flower with 5 petals instead of 6.  Layer up some flowers using 3D foam pads.
  5. Add extra detail to flower centres by cutting them from white glitter card and adding fringe paper to them. 
  6. Cut leaves from green FE Textured card using the FE Nesting Blooms dies and cutting into individual petals.  Score a line down each, ink edges and shape using a pokey tool or pencil.  Snip some leaves in half to create smaller ones.
  7. Arrange flowers and leaves as desired and glue into place on the circle top of the sentiment tab, leave to dry.
  8. Add ‘with love’ ribbon to front of plant pot.  Die cut 2 tag shapes using FE tags dies and stamp ‘Best Mum’ on to white tag using Dovecraft clear stamp.  Add tags to plant pot along with a pink adhesive gem.
  9. To finish, add pink adhesive gems to flower centres and slide sentiment stem / flowers into plant pot.

Painted Blooms Collection:
6x6 Paper Pad – DCPAP051
Satin Ribbon – DCRBB010
Adhesive Gems – DCDOT021
Plus:
First Edition Nesting Bloom Dies – FEDIE163
First Edition Tag Dies – FEDIE016
First Edition 12x12 Textured Card – FEPAD062
Dovecraft Clear Stamp – DCSTP094
Dovecraft Clear Stamp – DCSTP010
Dovecraft Fringe Paper – DCTOP040
Dovecraft White Glitter Card – DCGC02
Black Ink, Brown Ink
Adhesives: D/STape, 3D Foam Squares, Clear Drying Glue

Wednesday 22 March 2017

Mother's Day Card - Step by Step - Papermilldirect DT


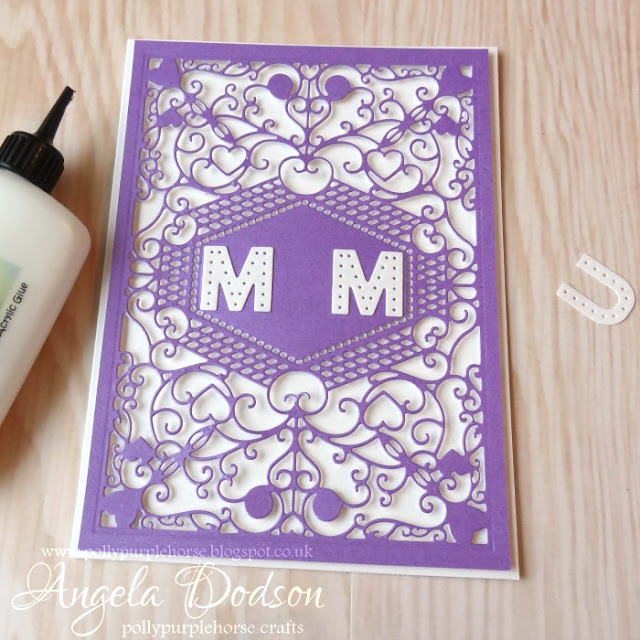
Hello, it's almost Mother's Day and I have another card to share with you. It could also be for Mum’s birthday. The ‘papercut’ panel effect is very popular at the moment and dies are a great way to achieve a similar look in an easy way.  I have been playing with one of the new Craft-A-Card dies and some of the gorgeous Papermilldirect Lustre Print cardstocks.  These are 300gsm, fabulous quality cardstocks with a luxury lustre finish and they cut beautifully through my Big Shot die cutting machine


 Step by Step:

 Cut the 5x7” craft a card die from Papermilldirect Periwinkle Lustre Print Silver card.


 Remove the waste from the die cut by shaking it, use a pokey tool for any tiny bits.

Trim the die cut panel down to leave an even border all around (I cut to approx. 18.5 cm x just over 13cm).  Add foam squares to the back of the panel, add them around the outside and to the larger shapes, cut them smaller if required for some areas.


Score and fold an A4 sheet of Papermilldirect Natural White Pearlised cardstock in half, trim down to create a 5 ½” x 7 ½” card base.  Carefully position die cut panel onto the front and when happy with positioning press down firmly to secure.

 Die cut letters to spell ‘MUM’ from PMD Natural White Pearlised card using an alphabet die set.


Glue letters to centre panel on card front, using a clear drying glue.  For even spacing, glue the first and last letter in place and then add the centre letter.


Die cut a selection of flowers and leaves from PMD Lustre print Silver card.  Spring Green for the leaves and the pink shades for the flowers.


Shape the flower petals and leaves in your fingers to give shape, layer some up using 3D foam pads and then glue as desired to card front.


To finish add an adhesive gem to the centre of each flower.

I love the pretty colours in Papermilldirect’s Lustre Print card range, The Periwinkle is sooo pretty and my favourite colour, so I themed this card around the purple and pinks.  There are lots of other shades to check out too, why not try experimenting and if you make a project using PMD card then please do share it over on the Facebook page, Twitter or Instagram, we love to see what you have been making.
Angela x
Products Used:
Lustre Print Silver 300gsm Card in Periwinkle, Spring Green, Persian Pink, Misty Rose, Red Wood – Papermilldirect.
Natural White Pearlised card 300gsm – Papermilldirect.
Craft A Card Die 5x7” FEDIE179 – First Edition
Alphabet Headliner Die XCU503153 – X Cut
Faux Quilled Blooms Dies CED1402 – Creative Expressions
Self Adhesive Pearls
Adhesives: Cosmic Shimmer clear drying glue, 3D foam pads


Monday 20 March 2017

Painted Blooms MUM Card - Trimcraft DT


Hello I have a +Trimcraft Ltd DT card to share with you today.  Have you seen those pretty Flower topped paperclips in the new Dovecraft Painted Blooms collection?  They are so cute and I just had to use them along with the pretty papers and other matching embellishments to create this tag style bunting card.  This card would be good for Mother’s Day or Mum’s Birthday.

Step By Step:
  1. Score and fold A4 Dovecraft White card in half, trim down to create a 7 ½” x 5 ½” card base with fold across the top. Add a rectangle of striped Painted Blooms paper to card front leaving a white border all around.
  2. Cut Painted Blooms pattern paper approx. 6 5/8” x 4 5/8” and mat onto slightly larger white card using D/S tape, mat onto card front.  Using a white pen add a faux stitch detail around edges of pattern paper.
  3. Adhere a strip of lace ribbon across top of card, allow ends to overhang edges and trim at an angle, seal with clear drying glue to prevent fraying.  Glue a green mini bow to each end.
  4. Using the FE Scalloped Circle dies cut 3 smaller circles and 2 larger circles from Vellum (sized to fit onto tags).  Take 3 Different shaped Painted Bloom tags and add faux stitching all around these and the vellum circles using a white pen.
  5. Die cut letters to spell MUM from white glitter card using the FE Alphabet dies.  Glue a letter onto each small vellum circle and then again onto a larger circle.  Glue each letter to a tag using clear drying glue throughout.
  6. Take 3 flower paperclips and arrange across lace ribbon, use 3D foam to adhere at angles as desired.  Add 3D Foam to the back of each tag before slipping them onto the paperclips.  Arrange as required before pressing down to adhere.
  7. To finish, add a strip of Flower Tape across the bottom of the card.
Dovecraft Painted Blooms Collection:
8x8 Paper pad - DCPAP050
Printed Tags – DCTOP045
Paper Clips – DCTOP046
Lace Ribbon – DCRBB010
Mini Bows – DCRBN023
Flower Tape – DCTOP047
Plus:
Dovecraft A4 White Card
Dovecraft A4 Vellum
Dovecraft White Glitter Card
First Edition Alphabet Dies – FEDIE140
First Edition Scalloped Circle Dies – FEDIE071
White Pen
Adhesives: D/S Tape, 3D Foam Squares, Clear Drying Glue